“What on earth could one possibly want with a giant lightbox that you’ll then have to store in your 8’ x 11’ studio?” Yes...I can also hear this very legitimate question across cyberspace. And the answer is, I want to start working with stained glass! And I need a backlit workspace--preferably a roomy one--to do so. Perhaps you are an illustrator or designer, or work in a media that requires tracing. Perhaps you, too work on glass! Maybe an illustrator friend has commissioned you, the local handy-person, to build them a lightbox. Or maybe you just like the project. Whatever the case, here’s how to do it! Sort of.
I remembered to take photos slightly more frequently with this project, but as usual, feel free to email me if there’s some perplexing detail I didn’t cover.
Step 1: A good old Home Depot visit. On the shopping list: 1/2” thick pine board for the base (mine’s 24” x 30”), wood for the walls (I used thin poplar, because I didn’t want the box to be too heavy once I added the glass. If you’re super strong and can carry it around, some pine planks would be cheaper and a bit easier. Width of these planks = the eventual height of your box. Should be about 6”), two 24” ballasts to hold the bulbs, 4 matching bulbs (ask an employee for help unless you know your fluorescents, so everything will be compatible!), some 1/4” moulding strips, an extension cord with bare wires on one end and a plug on the other, a copper grounding wire, screws and washers (an appropriate length for attaching the ballasts to the pine bottom, and some more for attaching the walls to the base), a few wire clips for attaching the cord to the inside of the box, natural wood stain, and wood putty (optional) that matches your wood. You’ll also need a chop saw, a drill, a countersink bit that will match (roughly) your screws for the walls, and wood glue. Possibly some tack nails if you are using thin wood, like me. Last but not least, you’ll need a piece of frosted or laminated glass/plexi--good thick, strong stuff. You’ll likely need to order it from a glass shop, as hardware stores don’t generally carry this type of item. The size should match that of your base.
Step 2: Make sure your base is nice and square! If it’s already cut to size, double check with a carpenters square. I skimmed the edges of mine on the table saw, just to make sure (since the glass that will go on the top will also be square, you’ll have issues if your box doesn’t have right angles). Then measure the walls against the base, taking into account where your corner joints will be. I made miter corners, or 45 degree angles (nice and strong, and pretty, of course), and attached my walls to the outside edges of my base (since the walls were so thin) rather than on top, which would be more common. So my measurements for the walls, therefore, went from the inside of one miter corner to the inside of the next (whereas if you were mounting it on top, you’d measure to the outside of the miter corners).
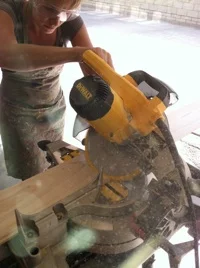
Step 3: Figure out how to finagle the saw to cut a horizontal 45, rather than vertical, if you (like me) previously had no clue how to do this. :) Cut your carefully measured walls on the chop/miter saw. Measure twice, cut once!
Step 4: Since you’ve (naturally) made a mistake in cutting the walls despite measuring about 5 times, compensate by cutting down the base! And since you’re also too lazy to drive back to the campus with the table saw, use your handy girly router to rout off that excess 1/2”. Sigh. Okay, back on track.
Step 5: Attach the walls to the base! Exciting stuff. Be sure to apply wood glue to each joint (corners and sides) for long term strength. Then use the counter-sink drill bit to drill holes through the thin walls (if your design is like mine) and into the base, then follow up with the screws. These will help hold the walls in general, and also hold everything tight while the glue dries. If you wish, you can then fill these holes with putty so your box will be pretty. Hey, you’ve gone this far...might as well take some pride!
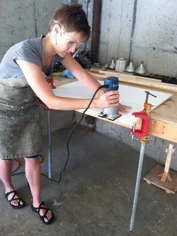
Step 6: Paint the inside of the box white, to help reflect light. I didn’t want to buy paint so I used gesso, since I had it on hand, which took so many coats that I probably should have just bought paint.
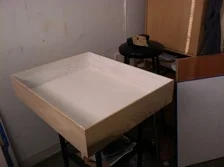
Step 7: Voila! You have a box! Now drill a little hole in the corner where you want the wire to come out (match the diameter of your wire/cord). If you don’t have a drill bit large enough for this, you can use the wiggle-a-small-bit-ruthlessly-around method.
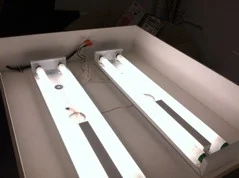
Step 8: Attach the ballasts (distribute them across the space so you take as much advantage of your will-be lights as possible). Make sure your screws (remember the ones you measured in the store?) don’t poke through the bottom of the box. I put a washer under each of these screws for stability since they were going through the thin metal of the ballast. After my helper bodily wrestled the perforated center part (see arrow in photo) of the metal out for the wires to go through (with the assistance of a hammer, pliers, and several sharp objects). Hopefully yours won’t require this, but if it does, better make sure your biceps are up to it!
Step 9: Wire that bad boy up. Run the extension cord end into the box through the hole you drilled, and read the directions that came with the ballasts for how to attach them...basically match the colors to the ones in the extension cord end, add the little caps, and run the copper grounding wire from the screw on one ballast to the screw on the other to the matching wire in the extension cord. Then attach your extension cord (the part inside the box) to the bottom of the box with the clips/screws so it isn’t in danger of being tugged/bumped and dislodging all your careful wiring (see arrow).
Step 10: Turn on your newly wired lights and experience a moment of glory.
Step 11: Glue the moulding or some other thin piece of wood around the inside of the box to form a small ledge to support the glass. I used thin moulding on the long sides, and some extra 1” x 2”s on the short sides for a little added stability. Just make sure that these are recessed from the top edge of your box by the thickness of the glass; my glass is 1/4” thick, so that’s how far down I placed the wood strips. This will allow the glass to sit flush with the edge of the box. You can check your work as you go with a ruler or an extra piece of glass if you have one. Then clamp or nail the strips in place while the glue dries.
Step 12: Collect your glass--if you don’t already have it--from wherever you ordered it from (hopefully this process will be easier for you than it was for me!).
Step 13: Since you’ve already invested so much energy in this project, go ahead and make it pretty (and protect the wood) with a bit of stain. So satisfying!
Step 14: Carry it up to your studio, spend a moment admiring your work, then turn off the lights and (drumroll)....plug it in!! Beautiful.
Disclaimer: I do not profess to be a lightbox expert, nor an expert at anything involved in this process. I almost feel inclined to say “do not attempt at home,” but that would rather defeat the purpose of this entry, which is to encourage hair-brained ideas and a can-do attitude. Just don’t drill through your finger or anything.
Good luck, and happy building!
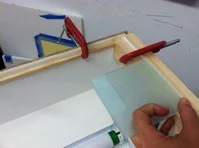
Step 11

Step 13
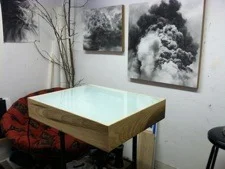
Step 14
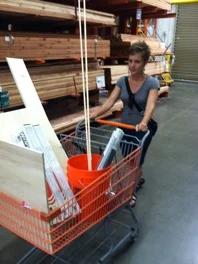
Step 1
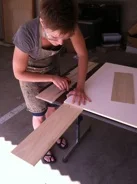
Step 2
Step 3
Step 4

Step 5
Step 6

Step 7

Step 8
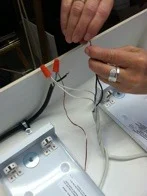
Step 9
Step 10

TA DA!